How to Make a Fabric Art Note Board Using an Upcycled Stretched Canvas
Materials Needed:
- Stretched canvas frame (e.g., 16" x 20")
- Fabric art (cut 4-5 inches larger than the frame)
- Thin backing material (same size as the frame)
- Electric staple gun (ARROW T50 5/16" staples recommended)
- 3/8" polyester ribbon (color of your choice)
- Decorative brads
- Awl (for puncturing holes)
- Hanging hardware (nail-on or screw-on hangers)
Step 1: Prepare Your Fabric and Frame
.webp) |
| A wooden frame wrapped with heart-patterned fabric and batting, secured with staples for a DIY Valentine's Day memo board.
|
- Choose sustainable fabric to reduce waste. Cut it 4-5 inches larger than the frame to allow for wrapping.
- Ensure your frame and fabric are correctly oriented (landscape or portrait).
- Cut a thin backing material piece the same size as the frame and place it on the back for extra softness.
Step 2: Attach the Fabric to the Frame
.webp) |
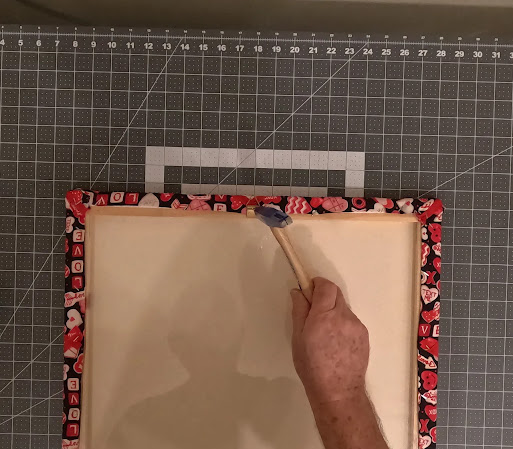
| Securing fabric with a staple gun onto a wooden frame to create a DIY memo board with a Valentine's Day theme.
|
.webp) |
| Stapling the final side of fabric onto a wooden frame to complete a DIY memo board with a Valentine's Day theme.
|
.webp) |
| Securing the fabric onto the back of a wooden-framed memo board with a staple gun for a polished DIY project.
|
.webp) |
| Stapling fabric securely onto the back of a wooden-framed memo board, ensuring a neat and stylish DIY finish.
|
.webp) |
| Securing the fabric around the edges of a wooden memo board with a stapler, creating a stylish DIY fabric-covered organizer.
|
- Fold one side of the fabric over the frame and wrap it around the back. Staple every 4 inches from the center outward. Leave corners loose.
- Move to the opposite side, pulling the fabric taut before stapling.
- Repeat for the top and bottom, ensuring the fabric remains smooth.
- For corners, pull excess fabric toward the center, staple securely, and trim excess.
Step 3: Add the Ribbon Design
.webp) |
| Adding diagonal red ribbon to a fabric-covered memo board with a Valentine’s-themed design, creating a stylish and functional DIY organizer.
|
.webp) |
| Attaching red ribbon to the back of a fabric-covered stretched canvas frame to create a DIY memo board with a stylish and functional design.
|
- Pick a ribbon that complements your fabric.
- Start at one corner, staple the ribbon on the back, stretch it diagonally across the front to the opposite corner, and staple.
- Repeat from the remaining corners to form an “X.”
- Create a grid by adding horizontal and vertical ribbons, stapling each securely at the back.
Step 4: Secure the Ribbon with Brads
.webp) |
| A DIY fabric-covered note board with red ribbons being secured with brads on a stretched canvas frame, creating a stylish and functional memo board.
|
.webp) |
| We craft a fabric-covered note board using a stretched canvas frame, decorated with red ribbons and silver brads for a stylish and functional DIY project.
|
- Use an awl to puncture small holes at each ribbon intersection.
- Insert decorative brads and bend tabs on the back to secure them.
Step 5: Attach the Hanging Hardware
.webp) |
| We staple fabric art onto a stretched canvas frame to create a DIY note board. A step-by-step upcycling project for sustainable home decor.
|
- Use nail-on or screw-on hangers for easy mounting.
- If preferred, attach wire with screw-on eyelets for an alternative hanging option.
Step 6: Display and Enjoy!
.webp) |
| We create a DIY fabric art note board using a stretched canvas frame. A sustainable and stylish way to organize notes, photos, and memories!
|
- Your eco-friendly fabric art note board is ready! Pin notes, pictures, and keepsakes.
- Experiment with recycled fabric patterns—florals, hearts, bees, or abstract styles.
Upcycling old stretched canvas frames into note boards helps reduce waste and adds a stylish, sustainable touch to your space. Try this DIY today and share your creations!
Sustainable Solutions Studio – Eco-Friendly DIYs for a Greener Tomorrow!
.webp)
.webp)
.webp)
.webp)
.webp)
.webp)
.webp)
.webp)
.webp)
.webp)
.webp)
.webp)


.jpeg)


Comments
Post a Comment